Solar System – Electrical Design
When we bought our house, one of the criteria was a photovoltaic system on the roof. In 2018, we finally found our dream home, with a flat roof with no shade — it was perfect! In this series of posts, I will describe the design and installation of our system. It is a 9.4kW system designed and built by me. My goals were to learn about solar and large power systems, as well as be environmentally friendly and reduce our carbon footprint.
If you are any bit handy, there are many many resources and communities online that can help. The overall system was not complicated.
I will now cover the electrical plan and inverter selection. In Part 1, I discussed the design and installation of the panels. The installation allows for 22 panels: 11 facing east and 11 facing west. I bought an entire pallet of 32 panels, some of the calculations below include an additional 7 panels installed on the garage roof – but these are a test/playground installation which has significant shading during the day.
Because of the different facing I will create two series strings of 11 panels each. This is for two reasons:
- Most inverters work best up to approx 800V
- The inverter will be able to get more overall power, because it can use two MPPT trackers to track the different sets
Below is the relevant section of the datasheet for the panels. My panels were the 325s:
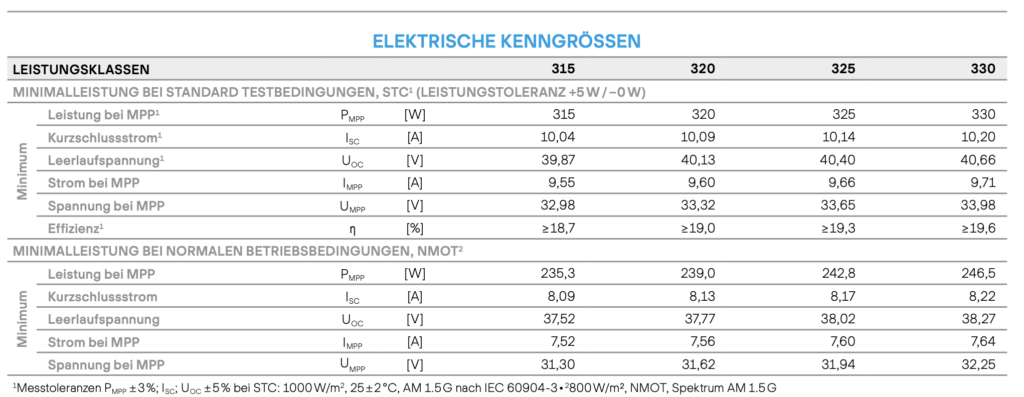
Within a series string, the voltages of each panel will be added together. This means that if it were a single string, it would have a voltage of 888V. Because of the two strings, this is then cut in half (444V DC). So we are looking for an inverter which has two MPPT trackers and an input of around 450V DC and around 7200W
Since this is my first solar, the choice of brand was important since this is the beginning step into a company’s ecosystem. Any future additions will have to integrate with whatever system we choose. Specifically, I want to add battery storage in the future so whatever provider we choose I want to integrate their storage into the existing system. We also want to get an electric car, so it would be nice if a charger integated into the solar system. We looked at the Fronius Symo, SMA Sunny Tripower, and the Kostal Plenticore.
Kostal has an interesting idea: their inverters can be extended with a license key and support batteries. While this was a plus, they only offer high voltage batteries. I want to do a DIY battery, and I’m not sure I want to be DIY-ing a 400+V battery. Fronius Symo hybrid also uses high voltage batteries. I was now looking for systems which use 48V.
SMA has the Sunny Boy storage, which uses high voltage batteries, as well as the Sunny Island which uses 48V. SMA also has a partnership with Mennekes, and their Amtron EV charging stations work to charge an electric car using only solar power and cooperate with the SMA Home Manager.
In the end we chose an SMA Sunny Tripower 8.0. This should handle the 7150W of our main roof, as well as the 2275W of the garage.
Undersizing your inverter
You usually want to undersize your inverter. The reason here is because the inverter only reaches peak efficiency after 30% of its total output power. You can see the efficiency curve in the datasheet of my chosen inverter below
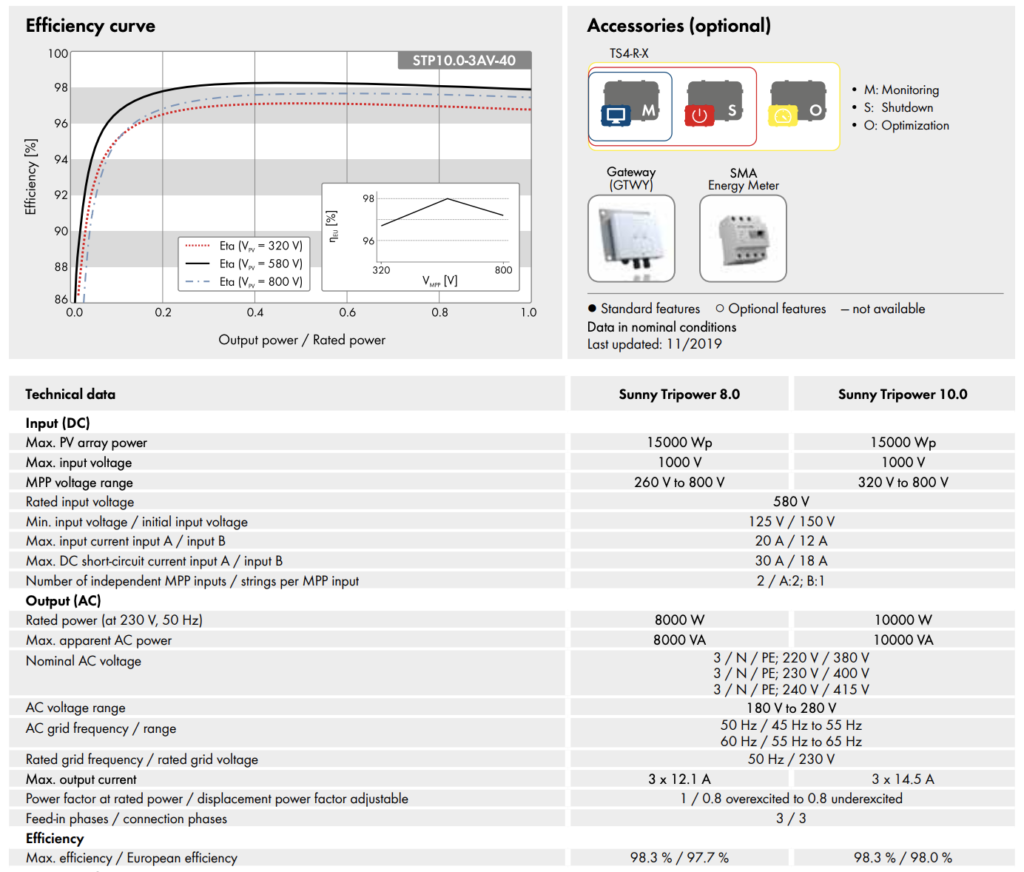
For an extreme example, if you have a 10kW inverter and 10kW of panels, your panels must be output at least 3000W of power before your inverter reaches peak efficiency. A lot of time is spent below 3000W – mornings, evenings and winter months. If you were to undersize the inverter and use a 6000W inverter, then this 30% peak is after 1800W so you will have additional power during the winter/morning/evening. This additional efficiency comes at the expense during peak sun which happens for a few hours around noon on sunny days in April – July — here the panels could produce 10000W, but the inverter is only able to convert 6000W. We need to find a tradeoff of power lost during peak times vs. power gained during cloudy / winter days. A smaller inverter costs less, and according to the EEV laws here in Germany, we can only sell a maximum of 70% of our system’s size anyways. A good rule of thumb is the DC should be about 30% oversized. You can read more detail in this post from SMA.
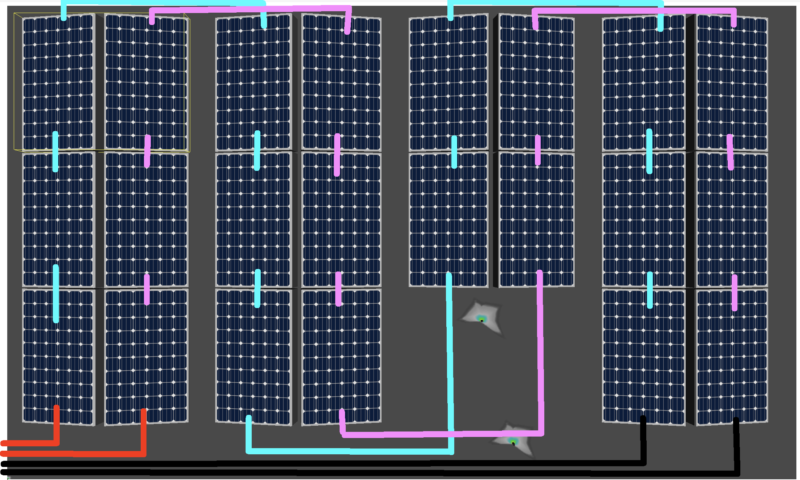
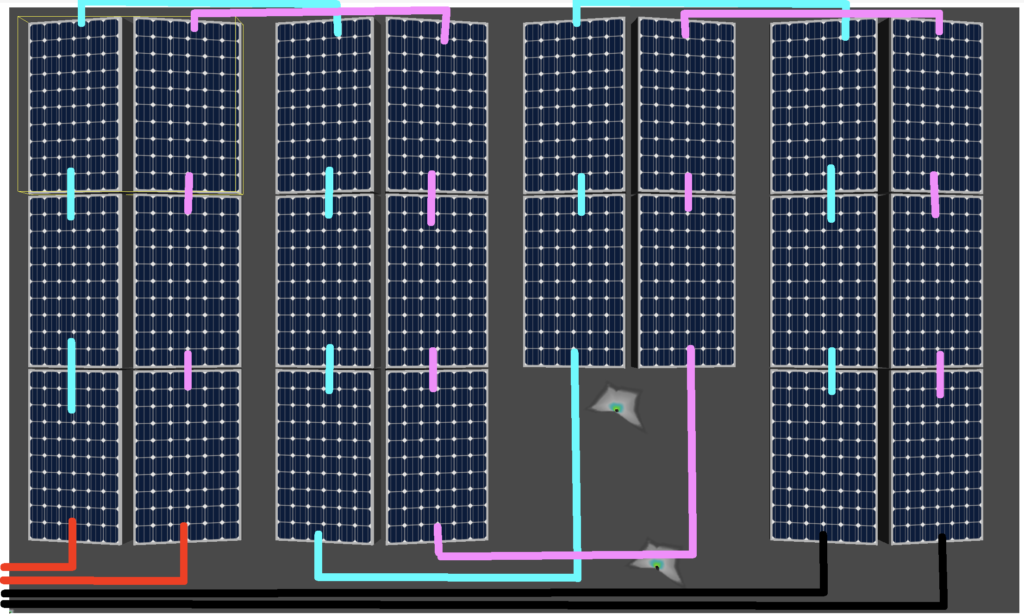
With the panels installed and the inverter chosen, the only thing left was to wire everything together. Four cables (two negative, two positive) are connected from the inverter in the garage, up the side of the house and onto the panels. The negative two connect to the negative side of the east and west strings, then each panel is connected together. The panels come with a wire and plug already attached and the plugs are male/female so you can’t hook things up backwards. The only cables I needed to make myself were the extensions between the rows.
Below is a logical diagram of how the two strings are wired together, black being the string negative down to th einverter, pink being the interconnects between the east-facing panels, light-blue is the interconnection between the west-facing panels and red is string positive back down to the inverter.
Below is a graph of a sunny day (May 15, 2020) showing the different string outputs. This is about 55kWh of total energy which is around 14€ of power if I were able to use it all, or 5,50 if I didn’t use any of it and sold it all. Our current usage is around 50% on average over the year, so I figure today’s value from our system is about 10€
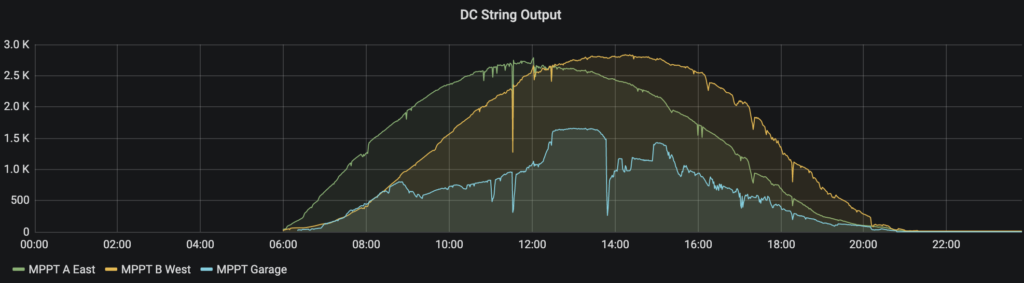
Of interesting note, the large drop shortly before 2pm in the blue “MPPT Garage” is the 70% limitation kicking in. The garage is the inverter that reacts the fastest and derates. A large load in the house shutoff which is easy to see in the graph below:
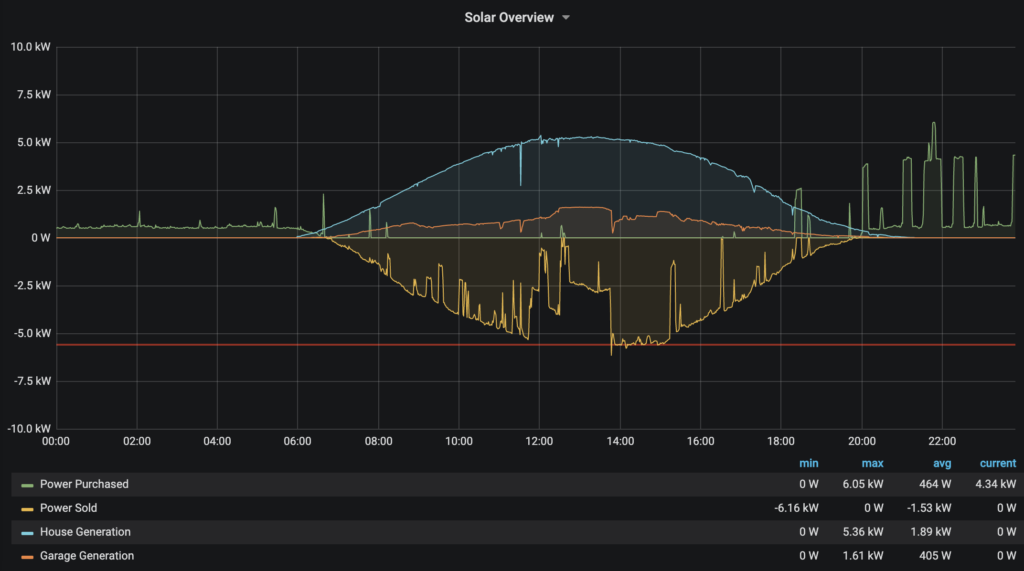
Blue is “House Generation” (22 panels), reddish is garage generation and yellow is power that we are selling into the grid. You can see a large load in the house (generation but absent sell) abruptly ends shortly before 2pm, and suddenly a spike of power below the red line is sold to the grid. The red line represents the maximum we’re legally allowed to sell, and immediately the garage reacts and derates its power output to compensate and hold our sell at 5.6kW.
In part 3, I will discuss current/future plans to integrate storage in the system, to try and be 100% solar during summer months, and use 100% of our solar energy in the winter months.
1 thought on “Solar System – Electrical Design”
Comments are closed.